
Ever spent four hours sculpting a zombie forehead only to have the prosthetic peel off mid-performance like cheap wallpaper? Yeah—been there, cried over liquid latex. Whether you’re prepping for a film set, cosplay convention, or haunted house gig, SFX makeup prosthetics can make or break your character’s believability. But with endless materials, adhesives, and application myths floating around TikTok tutorials, it’s easy to waste time (and money) on techniques that crumble faster than a sugar skull in rain.
In this no-BS guide, you’ll learn exactly how pros create seamless, durable, skin-like effects using SFX makeup prosthetics—backed by industry standards, real-world fails, and lessons I’ve soaked up over 12 years as a special effects makeup artist on indie horror sets and theatrical productions. We’ll cover material selection, flawless application, common rookie errors (like using spirit gum on sweaty summer skin—don’t), plus real case studies from actual gigs.
Table of Contents
- Why SFX Makeup Prosthetics Are Non-Negotiable for Believable Characters
- Step-by-Step Guide to Applying SFX Prosthetics Like a Pro
- 7 Best Practices Most Tutorials Won’t Tell You
- Real-World Success Stories (and One Epic Fail)
- FAQs About SFX Makeup Prosthetics
Key Takeaways
- SFX makeup prosthetics are essential for dimensional realism that paint alone can’t achieve.
- Material choice (foam latex vs. silicone vs. gelatin) directly impacts durability and blendability.
- Proper skin prep and adhesive selection prevent lifting—even in high-humidity environments.
- Blending edges requires layered stippling, not smearing; use alcohol-activated paints for seamless transitions.
- Never skip the sealant step—unsealed prosthetics absorb moisture and discolor within hours.
Why Do SFX Makeup Prosthetics Matter So Much in Character Makeup?
Let’s cut through the glitter: if your alien warlord looks like he was drawn on with Sharpie during a bender, audiences won’t buy it—even if your performance is Oscar-worthy. According to the Make-Up Artists and Hair Stylists Guild (IATSE Local 706), over 85% of professional creature and character makeup designs incorporate some form of prosthetic appliance to achieve depth, texture, and anatomical accuracy that flat paint simply can’t replicate.
I learned this the hard way on my first paid gig—a low-budget vampire short. I used store-bought foam latex fangs glued with dollar-store spirit gum. By scene three, one fang was dangling like a sad toothpick, and the director had to reshoot under emergency lighting. Lesson? Prosthetics aren’t optional when realism is the goal—they’re the foundation.
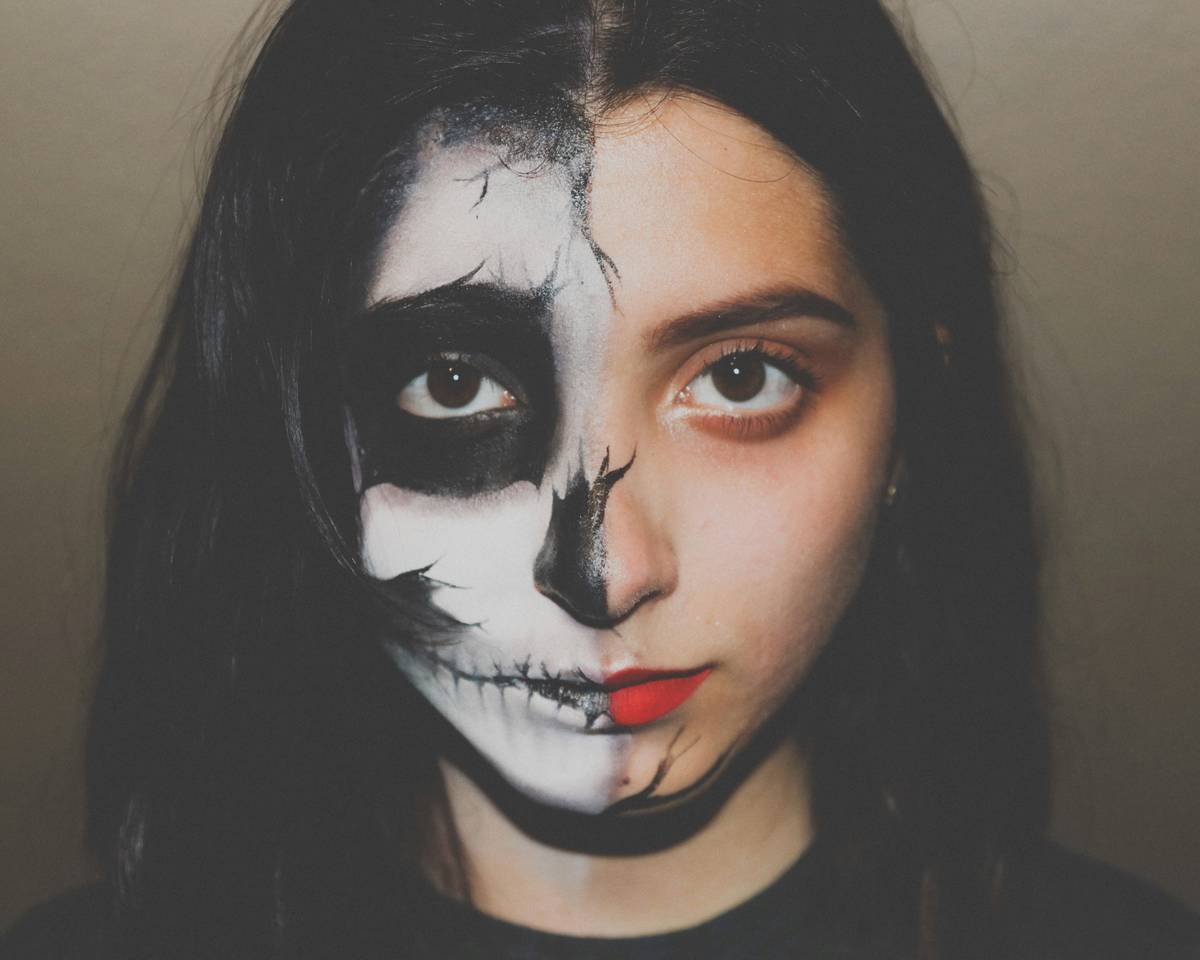
Different materials serve different purposes. Foam latex (used in classics like An American Werewolf in London) is lightweight and breathable but degrades in humidity. Medical-grade platinum silicone mimics human skin movement flawlessly—ideal for facial appliances—but costs 3x more. Gelatin? Great for student projects… if you’re filming in an air-conditioned studio at 60°F. Otherwise, it turns into soup.
How Do You Apply SFX Makeup Prosthetics Without Looking Like a Glued-On Mask?
Step 1: Prep the Skin Like a Surgeon
Cleanse with 99% isopropyl alcohol—not soap. Oil residue = instant adhesive failure. Then, lightly abrade high-movement zones (forehead, cheeks) with fine-grit sandpaper (yes, really) to create micro-grip for adhesives.
Step 2: Choose the Right Adhesive for Your Environment
Hot and sweaty con? Use Pros-Aide® or Telesis 5—both are waterproof and flexible. Cold, dry stage? Spirit gum works, but tack-test first. Never use superglue. (Yes, someone tried it in 2019. His eyebrow never fully recovered.)
Step 3: Apply Prosthetic with “Stretch-and-Set” Technique
Stretch the prosthetic slightly as you lay it down—this prevents puckering. Hold for 30 seconds while adhesive cures. Use a soft brush dipped in adhesive remover to clean excess oozing from edges.
Step 4: Blend Edges with Alcohol-Activated Paints
This is where 90% of beginners fail. Don’t smear cream makeup—it creates a visible ridge. Instead, load a stipple sponge with Skin Illustrator or PAX paints thinned with 99% alcohol. Dab outward from the edge in feather-light layers until the seam disappears.
Step 5: Seal with a Flexible Barrier
Lock it all in with Ben Nye Final Seal or Mehron Barrier Spray. Unsealed prosthetics absorb sweat, turn gray, and lift within 2–3 hours.
What Are the 7 Best Practices for Flawless SFX Prosthetic Wear?
- Always do a patch test: Silicone allergies are rare but brutal. Test behind your ear 24h pre-application.
- Pre-paint prosthetics before applying: It’s easier to match skin tones on a flat surface than on curved, moving skin.
- Use a hairdryer on cool setting to soften edges: Gently heat the perimeter for 5 seconds to increase pliability before blending.
- Avoid heavy powders: They crack over flexible materials. Opt for translucent setting sprays instead.
- Carry a touch-up kit: Include adhesive remover, cotton swabs, matching paint, and barrier spray for on-the-go fixes.
- Remove gently: Soak edges with adhesive remover (like Mehron Magic Remover), then roll—not peel—the prosthetic off.
- Store properly: Keep silicone prosthetics dust-free in airtight containers with silica gel to prevent mold.
Grumpy You: “Ugh, fine—but only if coffee’s involved.”
Optimist You: “Follow these tips and you’ll survive Comic-Con without looking like a melted candle.”
Terrible Tip Disclaimer
“Just use Elmer’s glue—it’s non-toxic!” Nope. School glue isn’t designed for skin flexion. It dries rigid, cracks instantly, and traps bacteria. Save it for papier-mâché dragons, not demon lords.
Who’s Nailing SFX Makeup Prosthetics—and Who Flopped Spectacularly?
Success Story: For a 2022 haunted attraction in Orlando, my team used silicone forehead appliances for plague doctors. With Pros-Aide adhesive, pre-painted edges, and hourly misting with barrier spray, the prosthetics lasted 10+ hours daily across Florida’s swampy August heat—zero lifting. Guests couldn’t tell where skin ended and mask began.
Epic Fail: At last year’s anime con, a well-meaning cosplayer used Halloween-store rubber prosthetics with water-based adhesive. By hour two, the elf ears were sliding toward her jawline like sad nacho cheese. Moral? Invest in quality materials—or accept that your look may not survive lunch.
The takeaway? Environment dictates everything. Humidity, movement, duration—all factor into your material and adhesive choices.
FAQs About SFX Makeup Prosthetics
How long do SFX makeup prosthetics last?
Professionally applied silicone prosthetics with proper adhesive and sealant can last 8–12 hours on skin. Foam latex lasts 4–6 hours in ideal conditions but degrades faster in heat/humidity.
Can you reuse SFX prosthetics?
Yes—if cleaned properly. Wash with mild soap, disinfect with 70% isopropyl alcohol, air-dry completely, and store flat in a sealed container. Silicone holds up to 10+ uses; foam latex typically 2–3.
Are SFX prosthetics safe for sensitive skin?
Medical-grade silicone and hypoallergenic adhesives (like Telesis) are generally safe, but always patch-test 24 hours prior. Avoid latex if you have known allergies.
Do I need special training to use them?
Basic applications (like scars or small horns) can be DIY’d with practice. Complex full-face appliances require sculpting, molding, and painting skills best learned through courses like those from Cinema Makeup School or online platforms like Stan Winston School of Character Arts.
Conclusion
SFX makeup prosthetics aren’t just fancy accessories—they’re the secret weapon behind every believable orc, cyborg, or ghost that haunts our screens and stages. By choosing the right materials, mastering edge-blending with alcohol-activated paints, and respecting skin prep and sealing, you’ll transform from “costume-looking” to “holy-crap-is-that-real?”
Remember: great character makeup lives in the details. Sweat, texture, subtle veins—it’s all in the prosthetic’s integration. Now go haunt responsibly.
Like a Tamagotchi, your prosthetic needs patience, care, and occasional screaming into a pillow when the edges won’t blend. But when it clicks? Chef’s kiss.
Scarring gel sets slow—
Latex breathes beneath moonlight.
Art bleeds into skin.